The final video is too big in size to place on the blog. I learnt a lot from doing this assignment. Fro semester one I learnt how to do modelling techniques which came in very useful when doing this assignment because I enjoyed doing the modelling.
I have learnt a lot from this course because I had never done animation before. Using a biped was very new to me. I found this very easy to do. Skinning was very difficult but now I knew how to do it, it will not be so difficult in the future. The animation was very difficult as well, I know understand a lot of the skills needed to make an animation look good. All of these skills will be very useful to me in the future because I might go into a job where I will need all these skills. I can also put the work into a portfolio for the future.
If I could do this project again then I would do things a little differently. I would make sure the biped is placed in properly to make sure that the animation and walking tool work well. I would also perfect the skinning before moving on to the animation. I would also not spend so much time on the modelling, because if the skinning and biped stages are not done properly then there is no need to make sure the model looks good because it will be distorted in the end.
Friday 7 May 2010
Editing
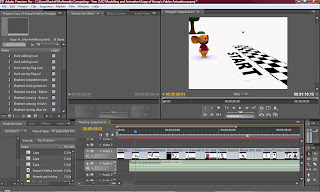
The editing took a very long time as the program was being very awkward. It was very difficult to preview the clips and what I had done in Premiere Pro because it was going very slow and kept jumping. I had to judge as best as I could what would look good. After I had arranged the clips, I then exported it to see what it looked like. After I had done this, I understood what the sound needed to be like. I went back, edited the sound and then exported the media again using the setting available on the program. The title page was really difficult to do because ive had no experience before with Premiere Pro. I eventuallly settled with a plane title.

Rendering
The duck walking in was the first render I did. When I saw the finished result I was very happy. It took four hours to render this scene. For this I knew I had to be quick with the animation because the rendering would take a very long time and I wouldn't have the time to finish. Other renders took a very long time. The longest render took 17 hours to complete 560 frames. This meant that I had to continue rendering through the night.
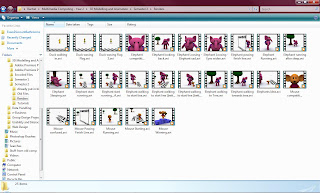
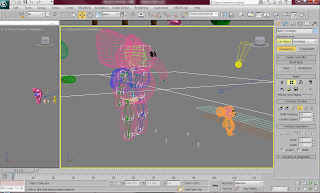
This image shows how many renders I had to do to make sure I had everything I needed to start video editing. Each render took a minimum of 4 hours. Some even took 17 hours.
This image shows how many renders I had to do to make sure I had everything I needed to start video editing. Each render took a minimum of 4 hours. Some even took 17 hours.

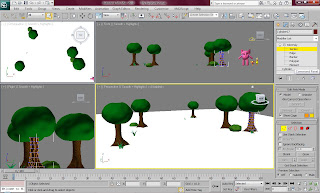
Cameras
The cameras came very useful during the animation and rendering. Once I knew the camera angle I wanted to render from I set a camera in the view and then pressed P on the keboard to come out of it and carry on editing. It also came in useful when more then one camera was needed on a file with more than one render needed. Below shows a file which had two cameras and it shows how I used them.

Visability Tool
One tool which came in very handy on many occasions was the Visability option. On many occassions I needed objects to disappear and reappear. This particularly came in very handy when making the characters blink. I could do this by adding a track and setting it to disappear at certain points on the timeline and then reappear later. This also came in very useful for when the characters were thinking. Look at the print screen below to see how I achieved this effect.

Footsteps
Footsteps were the most difficult part of the animation to do. I used the footstep mode to create footsteps for the characters to walk and run. I also used the convert tool to make sure I could edit the strides and the body posture. For the mouse I had to continuously bring the footsteps together because it kept on walking on its knees. For the elephant it would throw it's arms in towards its body. Because of this I had to make separate layers for his arms to make sure they were not hidden inside its body. The duck was the easiest to make walk because the only thing it did wrong was throw its arms inwards. The elephant was definatly the hardest as during the footsteps it kept bending its knees backwards and throwing its legs in random places. I solved this by using the convert tool and frame by frame, made sure that this would no happen.

Moving objects
This was by far the easiest animation I had done throughout the project. To make the characters look like they were running without making them move a lot. I simply grouped the background and set autokey. I then made a keyframe at 0 and moves the slider to a particular number when the charcter had stopped moving. I then moved the background to its finishing position. This was all i needed to do.

Animating
When I started animating, it was very difficult I had never animated before so it was very new to me. I had to make sure it was all done properly because the modelling looked really good and I did not want to make it look Bad at this stage. I thought the animation was fairly easy to do after I was shown how to do it. However, I wish I had experience of animating before I started the project because I if had experience in this then I would have done many things different during the modelling. Every stage of making this is very important and needs to be considered all the time.


Thursday 6 May 2010
Extra Scenery Items
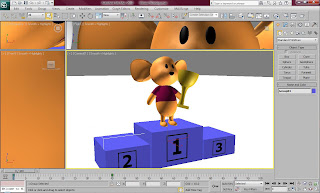
After I thought I was finished with the scenery I remembered I had a scene where it needed to show that the mouse had won. For this I would need podium and a winning trophy. I knew this would not be difficult to do because of the experience I had gained from so much modelling. Firstly I made three boxes and then assigned a UVW map to them. I had to make sure each of the boxes were a different height. I then assigned a material to them which was 'sub/object element' which allowed me to set different materials to each polygon of the boxes.
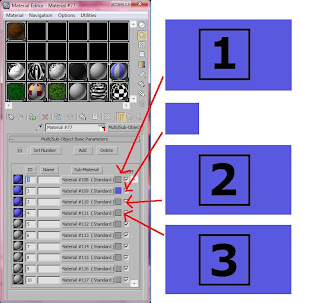
This is the material I used for the podium. The diagram shows how I produced this.
This is the trophy that I produced. I is made out of simple shapes and a half sphere. I made the colour yellow to show that it looks like gold.
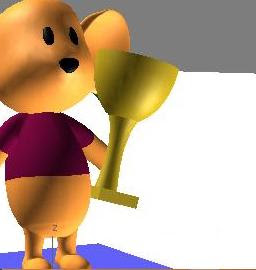
This is an image I used for the material. The other materials had other numbers on them.


This is the material I used for the podium. The diagram shows how I produced this.

This is the trophy that I produced. I is made out of simple shapes and a half sphere. I made the colour yellow to show that it looks like gold.

This is an image I used for the material. The other materials had other numbers on them.

Elly Skinned
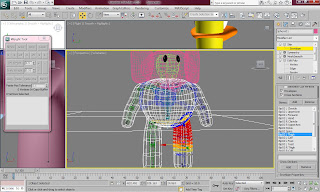
Skinning the elephant was not as difficult as I thought because it's body parts were very spaced apart. Once I had got to grips with the skinning process from the other characters, it was very easy doing the elephant. Similar to the mouse I thought I was finished and then when I began animation, some of the legs were accidently linked to the belly. I had to go back on many occassions and try skinning again. I got there eventually.

Mizo Skinning
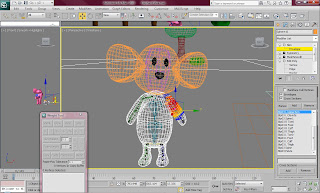
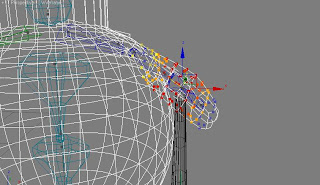
Mizo was very difficult to skin beause the body was one piece. Everything needed to be carefully skinned. the body was attached to all the bones except for the head and the neck. It took me to a long time to make sure that the arms moved properly. Once I thought i was finished, I started animating the mouse to see what it looked like. The mouse walked on his knees which was very strange. I then noticed that i forgot to add the mouse's calf to the body which meant that the bone wasnt included and the mouse was not walking properly. I used the same methods as when I skinned the duck.

Dito Skinning
The skinning was very difficult to do. It took such a long time and was so frustrating. Firstly I selected the duck's body and applied to skin modifier to it. I then added the boned of the biped that were contained within the ducks body. I then went through each of the body parts to make sure they had the right verticies connected to them. I had to continuously bake the editing to make sure i did not have to repeat a section. The most difficult part of the duck were his arms because they were joint to the body and pulled everything with it. The easier part were the legs and feet because they were two separate parts to the body so they did not need editing and moved fine. I tested it continuously to make sure i was doing it right. I had to make sure some of the extra parts to the duck were connected to the biped as they were not connected to anything and probably would not move along with the body. I did this by using the link tool and I linked parts like the eyes, the beak, and the flag to the biped to make sure it moved along with it.

Biped's
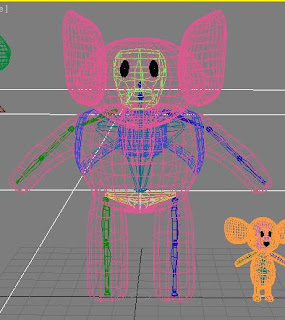
Once all the characters were made and looking right I had to apply a skeleton to them to make sure they will be able to move with human characteristics and movement. The duck was the most difficult to do as the body shape was very different in different parts of the body. I had to make sure all of the body were in proportion as the skinning would be difficult to do otherwise. I re sized the biped by using the select and uniform scale tool.

The mouse was quite easy to do because most of the mouses body parts are the same proportion as a human, except the leg length. I wanted to make sure it was done well so i was very thorough with the mouse.
The elephant was the most difficult to do because all of its body parts were out of proportion. Not only that, but the elephant didn't have hands or feet so I had to make the feet and hands so small that they couldn't be seen because the program would not allow me to take away the hands.

The mouse was quite easy to do because most of the mouses body parts are the same proportion as a human, except the leg length. I wanted to make sure it was done well so i was very thorough with the mouse.

The elephant was the most difficult to do because all of its body parts were out of proportion. Not only that, but the elephant didn't have hands or feet so I had to make the feet and hands so small that they couldn't be seen because the program would not allow me to take away the hands.

Start and Finish Lines
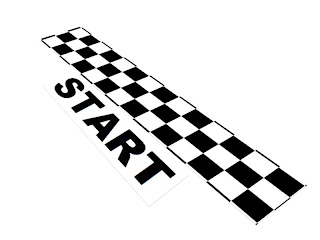
I started the start line first by creating a flat plane and using the material editor to make a checkered effect. I then adjusted the spaces between the black and white squares. Then I created another plane and assigned a material to it which contained a bitmap of the 'Start' image (shown below). I made sure that all planes had the UVW Map modifier applied to them.
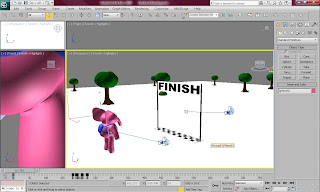
This is the finish line which was made the same way as the start line. I also included two cylinder poles to make it look more effective and less similar to the start line. This is so there is a difference and people understand what is going on.
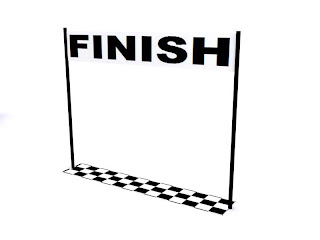
These are the images I used for the 'Start' and 'Finish' wording.
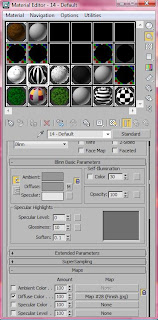
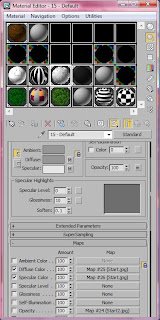
These are the material editor settings used to show the wording.


Scenery
The scenery was surprisingly not very difficult to do I used cylinders to make the tree trunks by distorting them using the edit poly modifier. I then made the tree leaves out of a sphere and assigned a material to it. The bushes are only small versions of the tree leaves and the grass was reshaped and distorted from cylinder shapes.
Below is the material I used for the bush. I used the tools and settings available on material modifier to make the leaf effect.
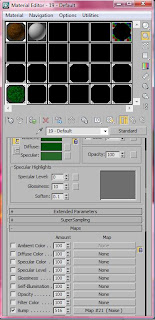
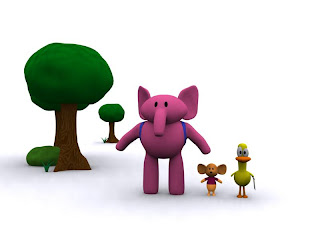
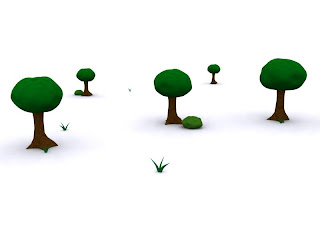
This is how the scenery looks after it is rendered.

Below is the material I used for the bush. I used the tools and settings available on material modifier to make the leaf effect.

This is how the scenery looks after it is rendered.

Problems with Materials
There was a big problem which occurred with the materials which meant that every time I rendered, anything that appeared with a material assigned to it, appeared black. This was a big problem because I could not render with things appearing black.
I found out that the problem occurred because the default material was set to 'arch and design' which was apparently not compatible with the file. To solve this solution I set each of the materials a parent files to 'Standard'.
The image below shows how I did this.
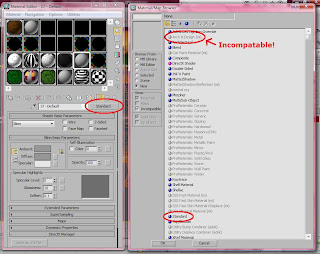
I found out that the problem occurred because the default material was set to 'arch and design' which was apparently not compatible with the file. To solve this solution I set each of the materials a parent files to 'Standard'.
The image below shows how I did this.

Tuesday 27 April 2010
The Characters - Modelled
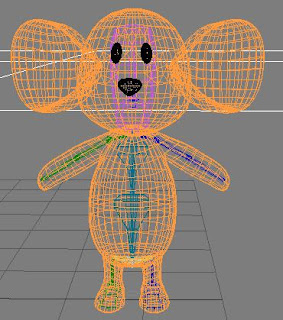
These are the final modelled characters which I will be animating. The next step is to put a biped inside the model and use skinning to make them move.

I am having many problems with the rendering at the moment. Every time I render an image, anything which is a plane with a material assigned to it, appears black. Which is shown on the flag. I will hopefully find out what is causing this and find a solution.

I am having many problems with the rendering at the moment. Every time I render an image, anything which is a plane with a material assigned to it, appears black. Which is shown on the flag. I will hopefully find out what is causing this and find a solution.
Mizo - Part 5 - Changes to Top
I noticed that Mizo's shirt would be very difficult to skin and make move with the body. Because of this I looked into different ways I could apply a shirt to him. I found some tutorials online and asked many of my friends. They gave me the solution of using Material ID's and applying them to each polygon. This was so much easier to do and I wish I had found it sooner. I needed to create a material with 'Multi/Sub-Object' Selected.
The image below shows how I did this.

This is a rendered image of the mouse's shirt with the edited polygons and the t-shirt that I originally made. They both look exactly the same and very similar, however, it would be lots easier during the skinning part to use material ID's.

The image below shows how I did this.

This is a rendered image of the mouse's shirt with the edited polygons and the t-shirt that I originally made. They both look exactly the same and very similar, however, it would be lots easier during the skinning part to use material ID's.

Mizo - Part 4 - Ears, Top and Face
The rest of the mouse was quite easy to make because it was very similar to the elephant. I had to make sure that it looked exactly like the drawings I made of the mouse.
I thought the ears would be very difficult to make but because of previous trial and error, I was able to make sure that I did not spend a lot of time on the ears. I made a sphere and squashed it to make the flat shape. I then reshaped it and using different tools, I was able to turn the sides of the ears inwards. I mirrored the other ear once I had made the perfect shape to make sure they were both identical.
The eyes and nose were very easy as well. I simply used spheres to make the shapes by reshaping them and squashing them. I then made them black to make sure they glisten.
The T-Shirt was very difficult to do because I needed to make sure it was only slightly bigger than the actual mouse. For this I copied the body shape and simply made it slightly bigger by using the select and uniform scale tool. I do not think this is the best way to make a T-Shirt so i might look into different ways I can make the T-shirt on the mouse's body.

This is the rendered finished mouse. I am quite inpressed with this character because he looks sweet and content which was the character I was trying to show.

Mizo - Part 3 - Arms and Head
After I had placed the sphere on top of the body, I knew I needed to shape it by using the select and uniform scale tool. I made it into a fat peanut shape. I made sure the head had the symmetry modifier tool applied to it so that it was in proportion.
The arms were a little harder to make because I wanted them to be a certain shape. They took a while to create because I wanted them to look exactly like they appeared in my drawings. I only needed to shape one arm because I extruded it from the body which had a symmetry modifier applied to it.

This is the rendered image of the mouse up to now. I think it is looking good so far. The more i add things and edit it, the better it looks. I think the ears will make it look really good.

Mizo - Part 2 - Head and Feet
After I had made the legs, I then formed the feet from this. It was very difficult to make the feet because I had to extrude them from the legs and form them by moving each vertex individually.
I created the head through using a sphere shape. I have not been able to reshape it yet but I am happy with the way it looks so far.

Below is the image of the rendered mouse so far.

I created the head through using a sphere shape. I have not been able to reshape it yet but I am happy with the way it looks so far.

Below is the image of the rendered mouse so far.

Thursday 22 April 2010
Mizo - Part 1 - Body and Legs
To start Mizo I looked at the basic shape of the mouse. Its body looked very similar to an egg shape so I created this using a sphere. I tilted the body back slightly to make it look like most of the weight is on the mouse's shoulders and it is leaning back.
I used the symmetry modifier to make sure that the body was symmetrically mirrored on both sides. This made it a lot easier to create the mouse's legs because while I creating the legs, the other legs was being formed at the same time.
I made the legs by extruding on legs from the egg shaped body. This was not difficult because I just shaped them by using the select and uniform scale tool to make the bottom half of the legs bigger.

Tuesday 20 April 2010
Dito - Part 3 - Feet and Flag
Dito took me roughly 3 days to complete. I think this was the easiest character of all three.
The feet were very easy to make and very similar to the way I made the legs. I made a sphere and used the select and uniform scale tool along with the edit poly modifier to make the feet look like how i designed them. I made one foot first and then changed the colour to match the beak and legs. I then made a mirrored copy of the foot to make the other one. I then positioned them on the end of the legs.

This is a rendered image of Dito without the flag. I am very impressed with how Dito turned out. I wasn't too keen with making him because the different shapes looked difficult to make, however, I found it surprisingly easy compared to the elephant.

The material for the flag was an image which I made in Photoshop. This image is shown below. I then found out that I did not need to use an image and I could have used the tools and features available on the material editor. Below is the material that I used for the flag.


Dito - Part 2 - Beak and Legs
The rest of Dito was also pretty easy to produce. I think this is because he has a really simple body shape and his features are simple shapes as well.
I created the beak by firstly making a sphere and reshaped it using many tools. I used the selection and uniform scale tool, edit poly modifier, soft selection tool, Meshsmooth tool and many more. I changed the colour of the beak to orange to make it match the body well.
The legs were very simple as well. I simply made a cylinder and used the select and uniform scale tool to make the bottom and top of the legs slightly bigger then the middle of the legs to show they connect to the body and feet. I then slightly bent the cylinder near the middle to make it seem like the duck has knees. The mirror tool came in very useful at this stage because I was able to make a mirrored copy for the other leg.

This is the rendered image shown below. It is nearly finished and I am very impressed with it at this stage. I only need to make the feet and flag and then Dito will be finished.

Friday 16 April 2010
Dito - Part 1 - Body, Head, Eyes and Arms
Dito was surprisingly easy to make. I started by making the shape of the body from a sphere. I then changed the colour of the sphere to yellow because Dito is a duck. Using the symmetry tool was vital because I needed to make sure that the body wash the right shape on both sides of the body. I then extruded the head from the sphere and shaping it to make it slightly larger on the top of the head. The body and the head was fairly easy to make as I was able to produce this within 3 hours. I did mess up a bit of the sphere on the duck but I fixed this by connecting some of the edges on the poly.
The eyes were very simple I made these out of spheres and used the select and uniform scale tool to make sure that they were shaped correctly and both with different sizes. This was to give the duck a slightly quirky look. I made sure the eyes were not pure white because they would blend in with the background and would not be seen very well. Because of this i made the eyes off white. I then made the pupils by making a sphere and squashing it flat. I changed the colour of the sphere to black and then mirrored a copy to make sure there were two identical pupils.
The arms were slightly more difficult to make. I had to extrude a section of the body which I thought would be sufficient enough for the arms and I then reshaped them to form a circle shape arm. I wanted to make the arm fairly thick to make sure that it could be seen, however, i only wanted the duck to have small arms to make it seem cute. The body had the symmetry tool applied to it so I did not need to shape the other arm and try to make it match. Instead I made one arm and the other arm naturally formed as I was producing it.

This is the rendered version of the duck so far. I am very confident at this point that the duck will look very good. I think this character needs to be very simple because it is not a main character.

Elly - Part 5 - Face and Bag
To form Elly's face I made an eye from a cylinder by squashing it and making it black. I then used the mirror tool to make the other eye which needed to be exactly the same as the first eye. I was very pleased with how the eyes turned out because they look exactly like they do in my drawing.
Yet again I was not happy with the ears of the elephant so I changed them and made them a lot simpler by using a squashed cylinder and shaping it. I then mirrored the image instead of using the symmetry tool. This worked lots better because I didn't need to reposition the ears, I only needed to move them over.

I added a few sky lights and allowed shadows which meant that the rendering took ages, however, I am extremely happy with how to lights made the elephant look. The rendered image of the elephants face is shown below.

I then had to make Elly's bag. This was very difficult to do because the straps needed to be formed around the body without going underneath the skin of the elephant. I need to make sure the bag doesn't move when the elephant moves because the bag or arms may look distorted.

The image shown below shows the finished bag. At a later time I might add some accessories to the bag like a handle or a strap.

Tuesday 23 March 2010
Elly - Part 4 - Ears
It took me ages to make the ears and they still do not look right. The shape looks good but I think they look too thin and realistic and not enough like a cartoon which was the effect I wanted.

I made sure that the ears were the same shape as the drawings I created. I used the planes as guidlines.

The image below shows how the elephant looks rendered so far.


I made sure that the ears were the same shape as the drawings I created. I used the planes as guidlines.

The image below shows how the elephant looks rendered so far.

Subscribe to:
Posts (Atom)

